How to secure Outlook with SafeIT Secure Disk
There are two ways to secure your e-mails, contacts and calendar data in Microsoft Outlook with SafeIT Secure Disk. Either you can choose to store all information on a secure disk, or just parts of the information.
The following information describes how to do this in Microsoft Outlook 2003, but it works on any version of Microsoft Outlook. The process should be almost the same.
A. Store ALL your Microsoft Outlook data on a secure disk
Follow these steps in order to secure your Outlook data.
1. Create a new secure disk that is big enough to be able to store your Outlook data file and future expansion. If you have enough with free space on your hard disk, we recommend that you create a disk with 2 GB of free space.
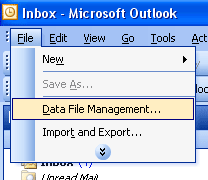
2. Start Microsoft Outlook and click the File-menu and select “Data File Management”...

3. Select your Personal Folders and click the button Open Folder.
4. Close down Microsoft Outlook (not, though, the Explorer window you just opened).
5. Move your PST-file (e.g. Outlook.pst) to your Secure Disk – for example by drag-and-drop.
6. Restart Microsoft Outlook. The program will tell you that Outlook couldn’t find the PST-file. Click OK and browse to your secure disk and select your PST-file.
7. Finished – your emails are now safe on your secure disk.
Note: In order to be able to access any of your Outlook information in the future you need to logon to your secure disk before you start Microsoft Outlook. If your disk is closed, Microsoft Outlook will not be able to access your encrypted data.
B. Store PARTS of your Microsoft Outlook data on a secure disk
Follow these steps in order to secure parts of your Outlook data.
1. Create a new secure disk that is big enough to be able to store your Outlook data file and future expansion. If you have enough with free space on your hard disk, we recommend that you create a disk with 2 GB of free space.
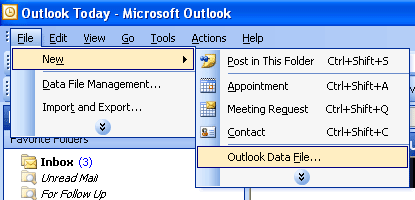
2. Start Microsoft Outlook and click the File-menu. Select “New” and then “Outlook Data File...”

3. Choose the format you prefer. We recommend “Office Outlook Personal Folder File (*.pst)”.
4. Save the file to your secure disk and select a name for the file, e.g. SecureOutlookFile.pst.
5. Choose a name for the data file, e.g. “My Secure Files” or similar.
6. Create the folders you would like to have in the new Outlook Data File and move all your items that you would like to store in a secure way.
Note: In order to be able to access any of your Outlook information in the future you need to logon to your secure disk before you start Microsoft Outlook. If your disk is closed, Microsoft Outlook will not be able to access your encrypted data.
 Read in PDF-format